
Disclaimer: This is a reference for my future self, when he’d forgot how to get this working, and for everyone interested in learning about the process I followed.
“Necessity is the mother of invention”. I had previously implemented fake realtime shadows for sprites in Trespassers using the stencil buffer, but, then, Unity 2017 beta version came across and imposed a necessity: not using the stencil buffer. Neat, isn’t it? My short experience fiddling with the excellent RenderDoc led me to think that the new “masking” feature is keeping that buffer for its internal use, nullifying my previous work. It took me several hours to figure it out, as I wasn’t expecting this behaviour, so hopefully this few lines can save you some headache.
Foreword: as I haven’t experienced performance issues and neither I am an expert at writing shaders, there may be many optimizations available in the code.
Requirements
- Avoid redoing the current artwork
- Realtime
- Depth should be taken into account (no need for realism, though)
- No/minimum CPU work
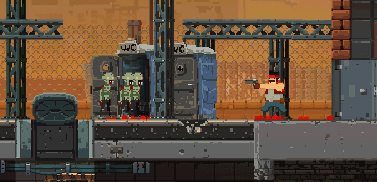
Optionally, reacting to more than one light, and using the forward path (I was already using it and I didn’t want to review all the work done before). Realism was obviously not an issue, but interaction was. It gave additional depth to the game visuals, filling the space, making the world a bit more responsive to our presence and actions. For that, I implemented both shadows and rim lighting so they can be used with SpriteRenderers in Unity, using the depth buffer and a custom shader(s).
Shadows
Shadows are a bit tricky, as we have no volume/depth in the scene with sprites + orthographic camera. Yes, the scene itself has elements layered at different z coordinates, but this is not enough to cast a shadow. The first option would be replicating the SpriteRenderer, placing it just behind the source SpriteRenderer, black and not totally opaque. This simple trick may be perfectly enough for your game, so try it and stop if it is what suits your game -look at old-school RTS games.
That shadow should depend on the relation among the light source, the shadow caster and the environment where it is projected. As the world is made of sprites and rendered through an orthographic camera, we have little information (by default) about the environment in the shader side. If only we had a depth buffer, we could “project” the shadow over elements close enough, modifying the alpha depending on the distance.
Shadow receivers
Getting the orthographic camera to render to a depth buffer is easy: just set the depthTextureMode to Depth, and you are good to go. Except you are not: that depth texture would be blank. Sprites do not render to the depth buffer. But shadow casters do.
I modified my shader (based on the default sprite shader Unity uses) to add shadows. The easiest way is to rely on Shaderlab shaders, as the simple #pragma addshadow will suffice
|
1 |
#pragma surface surf Lambert addshadow |
For this to work as expected, the shader cannot be queued in the “Transparent” queue: I put it in the “Geometry” queue. The RenderType was changed to “TransparentCutout”. Casting shadows on transparent materials appears to be problematic, so Unity documentation tolds us to set things as described. A bit surprising is that it doesn’t seem necessary to turn ZWrite On to fill contents in the depth buffer. Seems like it is only being used in perspective cameras, even when we are telling the camera to render the depth buffer. It would be necessary if you are facing sorting problems with the shader used for the entities themselves, although it can be solved by setting a lower order in the queue for the shadows (“Transparent-50”, for example)
|
1 2 3 4 5 6 7 8 9 10 11 12 13 14 15 16 17 |
// Custom lighting models, which aim to be simpler than the ones provided (these are for sprites anyway) // Flat shading, so light color is constant inline void LightingTileShading_GI(SurfaceOutput s, UnityGIInput data, inout UnityGI gi) { gi.light = data.light; gi.light.color = fixed3(1, 1, 1); } // Regular implementation inline fixed4 LightingTileShading(SurfaceOutput s, UnityGI gi) { fixed4 c; c.rgb = s.Albedo * gi.light.color; c.a = s.Alpha; return c; } |
As the Lambert light mode doesn’t fit the overall style, I decided to modify it to provide flat lighting. Shaderlab asks you for a lighting model for the different render modes (Forward, Deferred, ForwardAdd…) and the Global Illumination function. I’ve named the lighting model “TileShading”, so these are the functions needed (check the doc about creating a custom lighting model for naming conventions):
|
1 2 3 4 5 6 7 8 9 10 11 12 13 14 15 16 17 |
// Custom lighting models, which aim to be simpler than the ones provided (these are for sprites anyway) // Flat shading, so light color is constant inline void LightingTileShading_GI(SurfaceOutput s, UnityGIInput data, inout UnityGI gi) { gi.light = data.light; gi.light.color = fixed3(1, 1, 1); } // Regular implementation inline fixed4 LightingTileShading(SurfaceOutput s, UnityGI gi) { fixed4 c; c.rgb = s.Albedo * gi.light.color; c.a = s.Alpha; return c; } |
In the code you will find that there is conditional statement to use a different lighting model for ForwardAdd and the rest, but I’ve stripped it here. Aa a fan of Adventure Time, I wanted to try a stepped lighting (like some variants of the cel shading) which would be a bit less strong. Changing line 14 and adding the proper stepping function does it:
|
1 |
c.rgb = s.Albedo * stepAttenuation(gi.light.color); |
|
1 2 3 4 5 6 7 8 9 10 11 12 13 14 15 |
// Discretizes a continuous light color into several steps (not configurable yet) inline half3 stepAttenuation (half3 lightColor) { half step1 = 0.05; half step2 = 0.2; half step3 = 0.45; half attenuation = length(lightColor); half result = 0; result = step(step1, attenuation) * step2; result = max(result, step(step2, attenuation) * step3); result = max(result, step(step3, attenuation) * 1); return result * lightColor / attenuation; } |
Of course, you could configure the stepN values to whatever you want. For me, that was enough. If the code seems weird, is because I try to avoid conditionals in shaders. I don’t know if step, max or functions like those are implemented as “if…else” internally or to some native instructions in the GPU, so I’ve chosen to let the compiler do its work.
This gives the stepped effect, instead of a perfectly flat lighting that looks a bit strong in-game. So, with this modifications to a rather simpler shader, we have sprites rendering to the depth buffer! Watch how the different layers write different values depending on distance to camera:
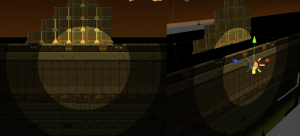

The values representing the depth can be adjusted with two parameters (+ camera’s far plane distance) that allows factoring and powering the depth stored, so you can, for instance, remark small differences in depth. The character is using another shader, that’s why he doesn’t appear in the depth test image, because he is one of the…
Shadow casters
Either we have a 2-passes shader, or we split the shader in 2 different ones. The second option allowed for better batching options, but the process is conceptually the same. The advantage os splitting into two shaders is that Unity3D is able to batch it. In this case, we need a simple script to replicate the SpriteRenderer. This is where the shadow caster is used, as the rest is left to the relation between source and environment. As I want to focus this post in the shader part, feel free to download the code (at the bottom) and check it; should be easy to understand.
The shader used for the shadow sprite will use that depth buffer previously rendered. It is a classic vertex + fragment shader, but the pass operates only in the Forward Add pass, so it is called for every point light that affects the sprite. I have stripped the input structures and other shader code.
|
1 2 3 4 5 6 7 8 9 10 11 12 13 14 15 16 17 18 19 20 21 22 23 24 25 26 27 28 29 30 |
v2f vert(appdata_t IN) { v2f OUT; float4 lightPos = _WorldSpaceLightPos0; // Convert to object space same as IN.vertex, so direction calculation gives valid result lightPos = mul(unity_WorldToObject, lightPos); lightDirection = (IN.vertex - lightPos) *_DistanceFactor; // As it is for 2D, it is placed at the same z as the vertex lightDirection.z = 0; // Recycle the lightPosition to calculate the vertex position lightPos = IN.vertex + lightDirection; lightPos.z += _ShadowDepth; half distance = clamp(length(lightDirection), 1, _PerspectiveFactor); OUT.vertex = UnityObjectToClipPos(lightPos * distance); #ifdef PIXELSNAP_ON OUT.vertex = UnityPixelSnap(OUT.vertex); #endif OUT.projPos = ComputeScreenPos(OUT.vertex); // Color is modified with distance to light OUT.color = _ShadowColor * (1 - smoothstep(1, _PerspectiveFactor, dot(distance, distance))); OUT.texcoord = IN.texcoord; return OUT; } |
The PERSPECTIVE_ON flag is a custom flag that we can set to make it useful for perspective cameras. Depth value is not distributed equally along the entire range, gathering more information for closer ranges, where precision is more important. It is not tested, but left here as a side note to remind that fact. _PerspectiveFactor simulates the deformation the shadow suffers according to the distance to the light source and target surface where it is projected. Fiddle with that value to check the effect.
|
1 2 3 4 5 6 7 8 9 10 11 12 13 14 15 16 17 |
fixed4 frag(v2f IN) : SV_Target { // Extract depth, and use it as factor to the alpha component #ifdef PERSPECTIVE_ON // Converts the depth to linear range (perspective cameras) float depth = Linear01Depth(tex2Dproj(_CameraDepthTexture, UNITY_PROJ_COORD(IN.projPos))).r * _DepthFactor; #else float depth = tex2Dproj(_CameraDepthTexture, UNITY_PROJ_COORD(IN.projPos)).r * _DepthFactor; #endif depth = saturate(pow(depth, _DepthPower)); fixed4 c = tex2D(_MainTex, IN.texcoord) * IN.color; // Non-linear alpha factoring with depth c.a *= depth * depth; return c; } |
Both _DepthFactor and _DepthPower are per-material properties, and affect the alpha with the following formula:
alpha_factor = ((depth * _DepthFactor)_DepthPower)²
Maybe there is room for a little improvement if we concatenate de depth * depth in the pow function as follows, but I opted for readability.
|
1 |
depth = saturate(pow(depth, _DepthPower * 2)); |
Caveats and possible circumventions
Some projections/calcuations are not accurate. I tend to place as much work in the vertex shader as I can, to make fragment shader lightweight, so that may be the reason. It should not matter for small/regular-sized sprites, but some issues may arise when working with large sprites. For instance, the number of lights simultaneously affecting the geometry has a limit, so a big sprite may be affected by more than you expect and give innacurate results. Other problems may be related to how the shadow is deformed, as the vertex are moved away and the interpolation among them may be innacurate too. Some of these problems can be solved by letting the fragment deal with the distances and calcuations, but perhaps at the expense of some performance.
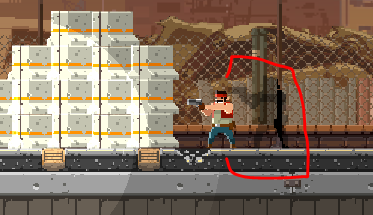
Shadows are “projected”, but separated from the original source. If you look at your shadow walking in an open area on a sunny day, your shadow is always in contact with your feet (unless you jump). Likewise, we expect the shadow to be close to the source. One possible workaround would be passing, from a script, a point that we assign as the contact point, and the distance from the place where it is being projected. In the shader, use this point as a reference to factor the shadow distortion related to the distance to the light source. Sounds complicated, and for a fast-paced action game, not even needed.
Sprites do not make use of ambient color. I don’t need this to work, although I feel curious about getting this done. A workaround would be passing a color for the ambient light to the shader, but it is not what designers/artists expect.
Shadows aren’t soft at the edge of the light range. I didn’t managed to get this working depending on lights’ range, although shouldn’t be hard anyway. If you can fetch the light attenuation, you may probably use it to factor the alpha channel.
Shadows go beyond walls that should stop them. My only suggestion is to rely on CPU casting rays to check where the walls are, and modify the mesh generated for the shadow sprite accordingly. Doesn’t sound straightforward -neither should be hard- and puts work on the CPU. There must be ways in the GPU to get this done, but I know of no one.
Shadows from same light overlap, darkening the background even more. If I was rendering to a texture like a lightmap I think it should be easier to properly specify the blending mode, but rendering directly to the fragment buffer leaves me wondering about a solution for this. Maybe you could modify the depth buffer, placing a far away value, to prevent the next fragment from overwritting, but that may hurt performance.
I want to learn more!
Shaders are a bit advanced topic for general programmers, so sometimes information is harder to find at the level of comprehension you may need. Practice helps, and looking at others’ code too, so you can always download Unity3D’s built-in shader code and take a look. The “.cginc” files are included, which help discovering how structures are built, or how some methods or macros work, for instance.
The other resource I used while developing the solution before was the code generated from the Shaderlab shader. Once compiled, you can select the shader and open the that generated code, which is a regular shader with many variants and passes.
Where is the code?
In this GitHub repo. It is the same as the used for the rim lighting, as it is my custom lighting solution for 2D games, so 2×1. I’ve wondered about the license that I should be using, and in lieu of helping everyone, I went for a GNU GPLv3, so everyone can benefit from the work of everyone, if someone else keeps updating it. Although no credit is needed, it would be welcomed 😉
Feel free to leave a comment or tweet me (@crazybitstudios).
See ya!
Leave a Reply